A local model implementation guide for research
Most people meet AI as a chat box: type a question, get an answer, copy the useful part somewhere else. That is fine for quick tasks, but it hides something useful. Capable AI is no longer only something you rent from a website.
Small models you run on your own laptop now sit close to last year’s flagships on many tasks. Gemma 4 26B A4B and Qwen 3.6 35B A3B are small by frontier standards, yet in public benchmark comparisons they land near systems like ChatGPT-4o and Claude Opus 4, and sometimes beat them on a particular task. That does not make them magic. It does mean the laptop model is not a toy for summarizing grocery lists.
This is a guide to actually getting one running and putting it to work: pick a model, load it, and point a coding harness like Claude Code at it. At the end I add a cheap cloud fallback for the days the laptop is not enough.
A few terms
Local model: an AI model that runs on your own computer instead of a company server. Good for private notes, offline work, and cheap repeated tasks.
Quantization: a way to store a model in a smaller numerical format. A model too large in full precision may fit on a laptop in 4-bit or 5-bit form. The tradeoff is some accuracy; the gain is that it runs.
MoE: short for mixture of experts. The model has many internal expert parts but uses only some of them for each token, so it can be faster than a dense model of similar total size.
Harness: the program around the model. A chat box only answers. A harness gives the model a workspace where it can inspect files, edit code, run commands, and use tools. Claude Code is the one I use here.
Start with the machine you already have
If you use an Apple Silicon MacBook, meaning M1 or newer, you already have a surprisingly good local AI machine.
The reason is unified memory. On many desktops the CPU has system RAM and the GPU has separate VRAM, so a graphics card with 32 GB of VRAM caps the GPU at 32 GB. Apple Silicon shares one memory pool, which Apple lists as unified memory in its Mac specs. A MacBook with 36 GB or 48 GB of unified memory can use that memory more flexibly for local model inference.
I have a MacBook with 48 GB of RAM. Two models I have used extensively are especially interesting:
The key words are quantization and MoE. Quantization helps the model fit. MoE helps the model move faster. For everyday work, speed matters. The difference between 20 tokens per second and 60 tokens per second is the difference between “I will wait” and “I will actually use this all day.”
Benchmarks are not the whole story, but they explain why this is worth trying. This llm-stats comparison puts Gemma 4 26B A4B and Qwen 3.6 35B A3B next to ChatGPT-4o and Claude Opus 4. I read comparisons like that as permission to use local models for routine work, not proof that they replace frontier systems.
Install and load the model
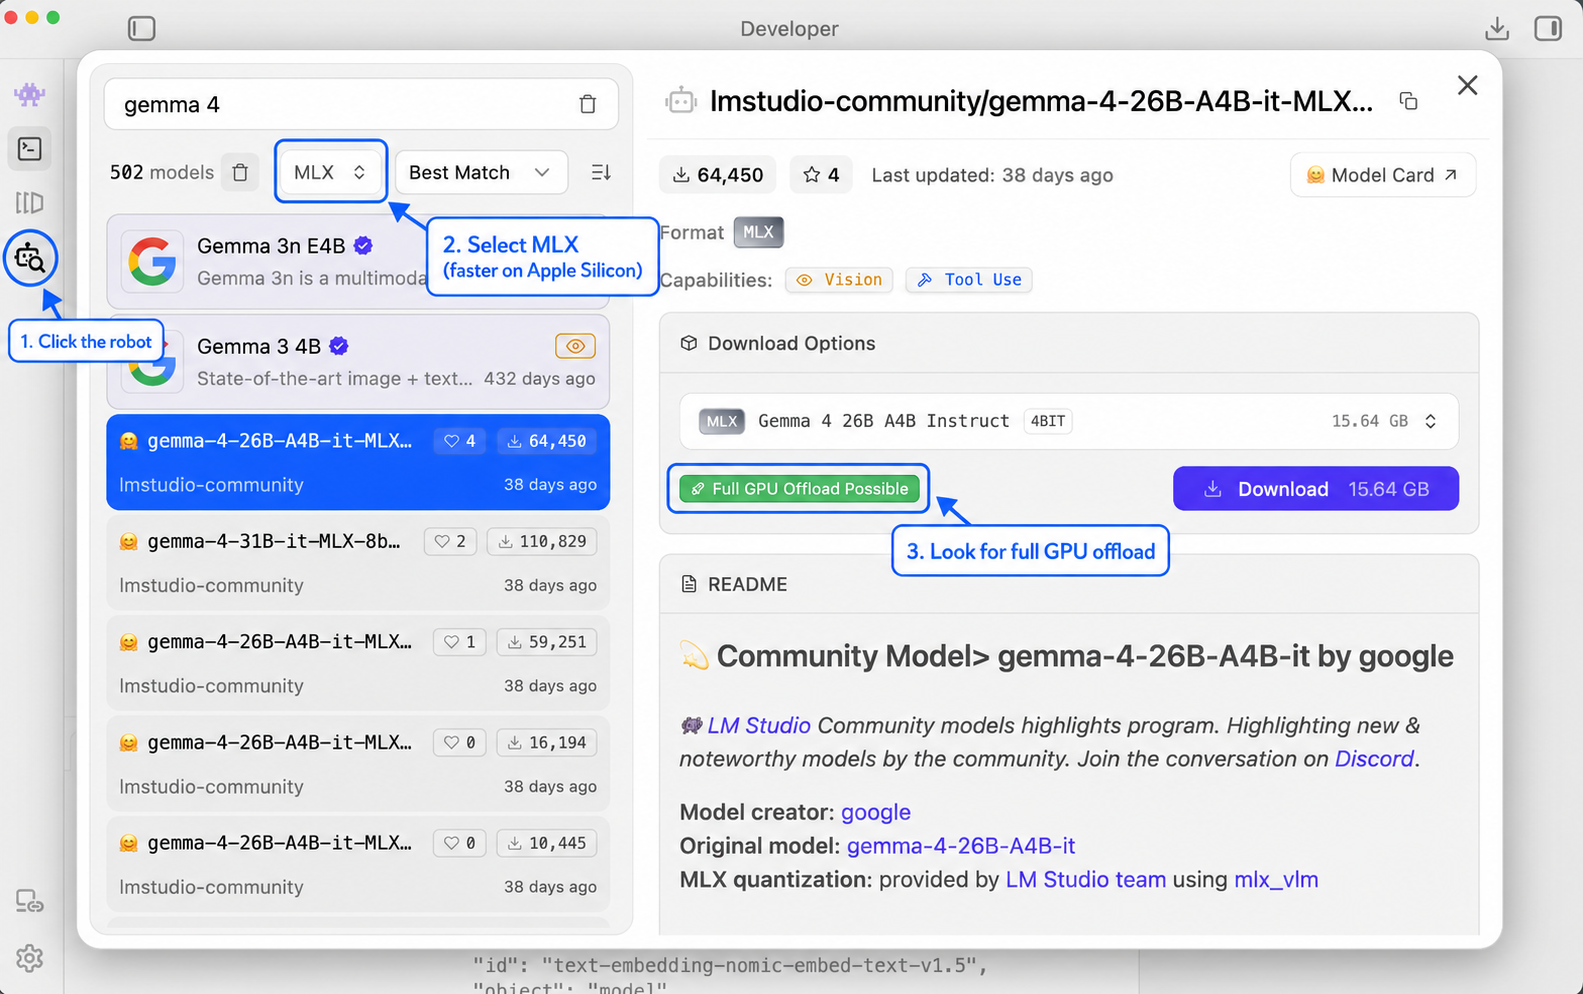
I install local models through LM Studio. It gives you a simple app, a model browser, and a local server. Ollama can do similar work, but MLX support is currently easiest for me through LM Studio.
On Apple Silicon, look for MLX models and full GPU offload when you can.

Point your harness at it
Running a local model is only half the trick. The other half is putting it somewhere useful.
Claude Code is one example of a harness. It is not itself the language model. It is the structure around the model. It lets the model inspect files, edit code, run commands, use tools, and keep track of a project.
A chatbot answers you. A harness lets the model work inside the project.
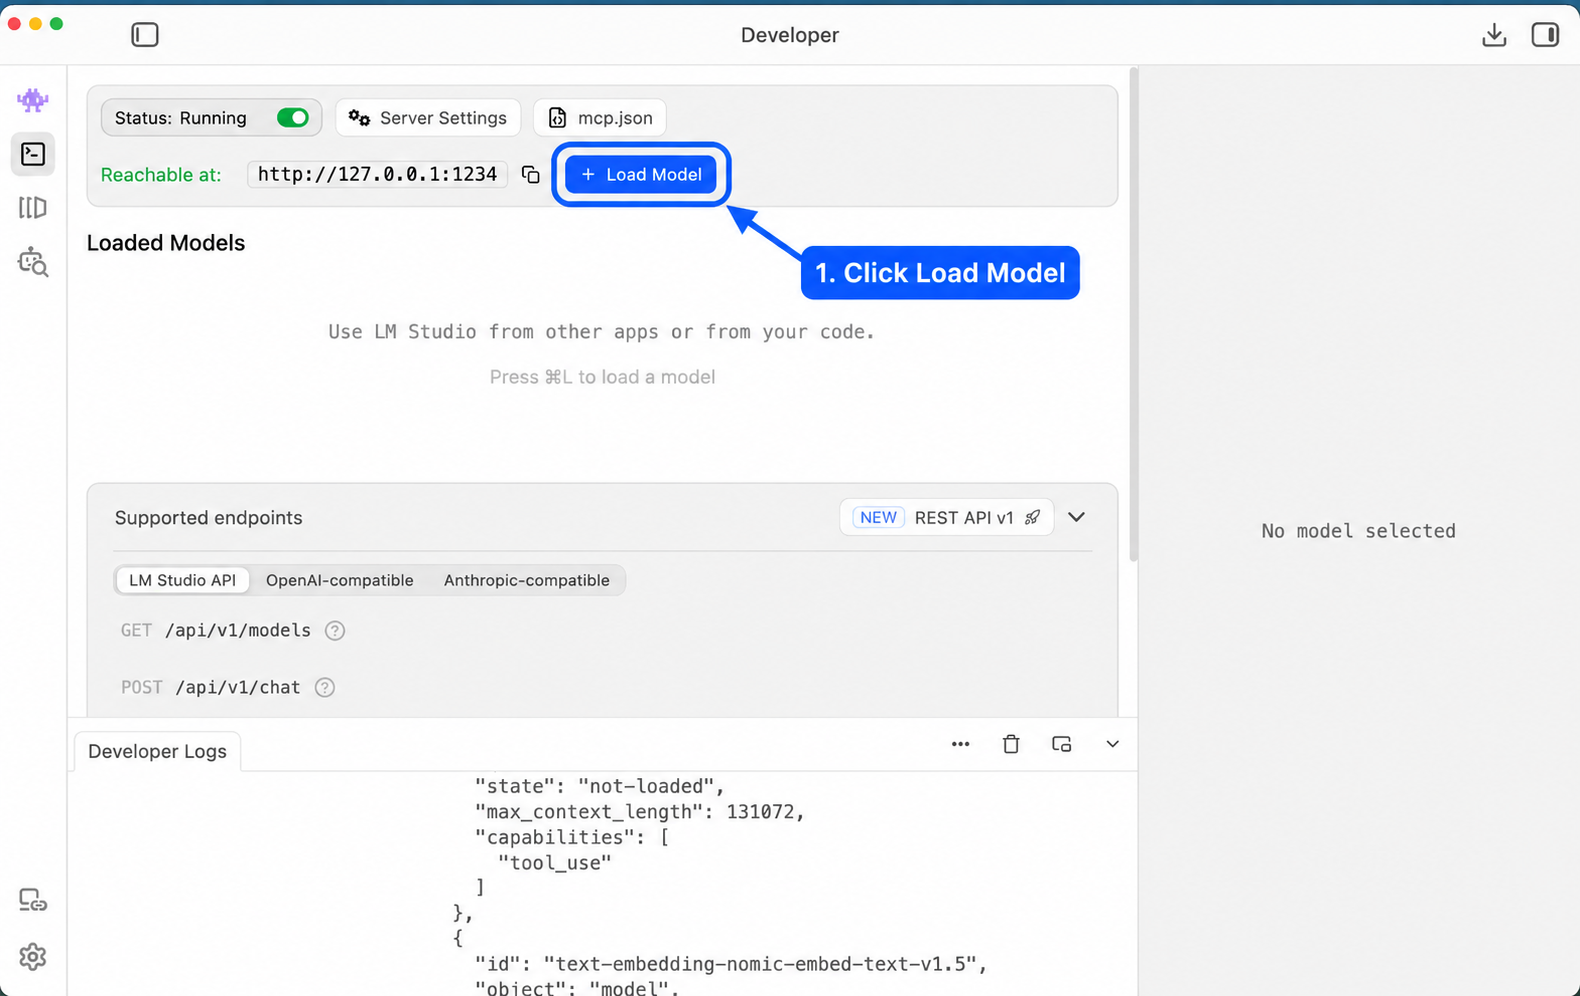
LM Studio documents this directly in its Claude Code integration guide: it can expose an Anthropic-compatible endpoint on your own machine. I use this inside VS Code because that is where most of my code lives.
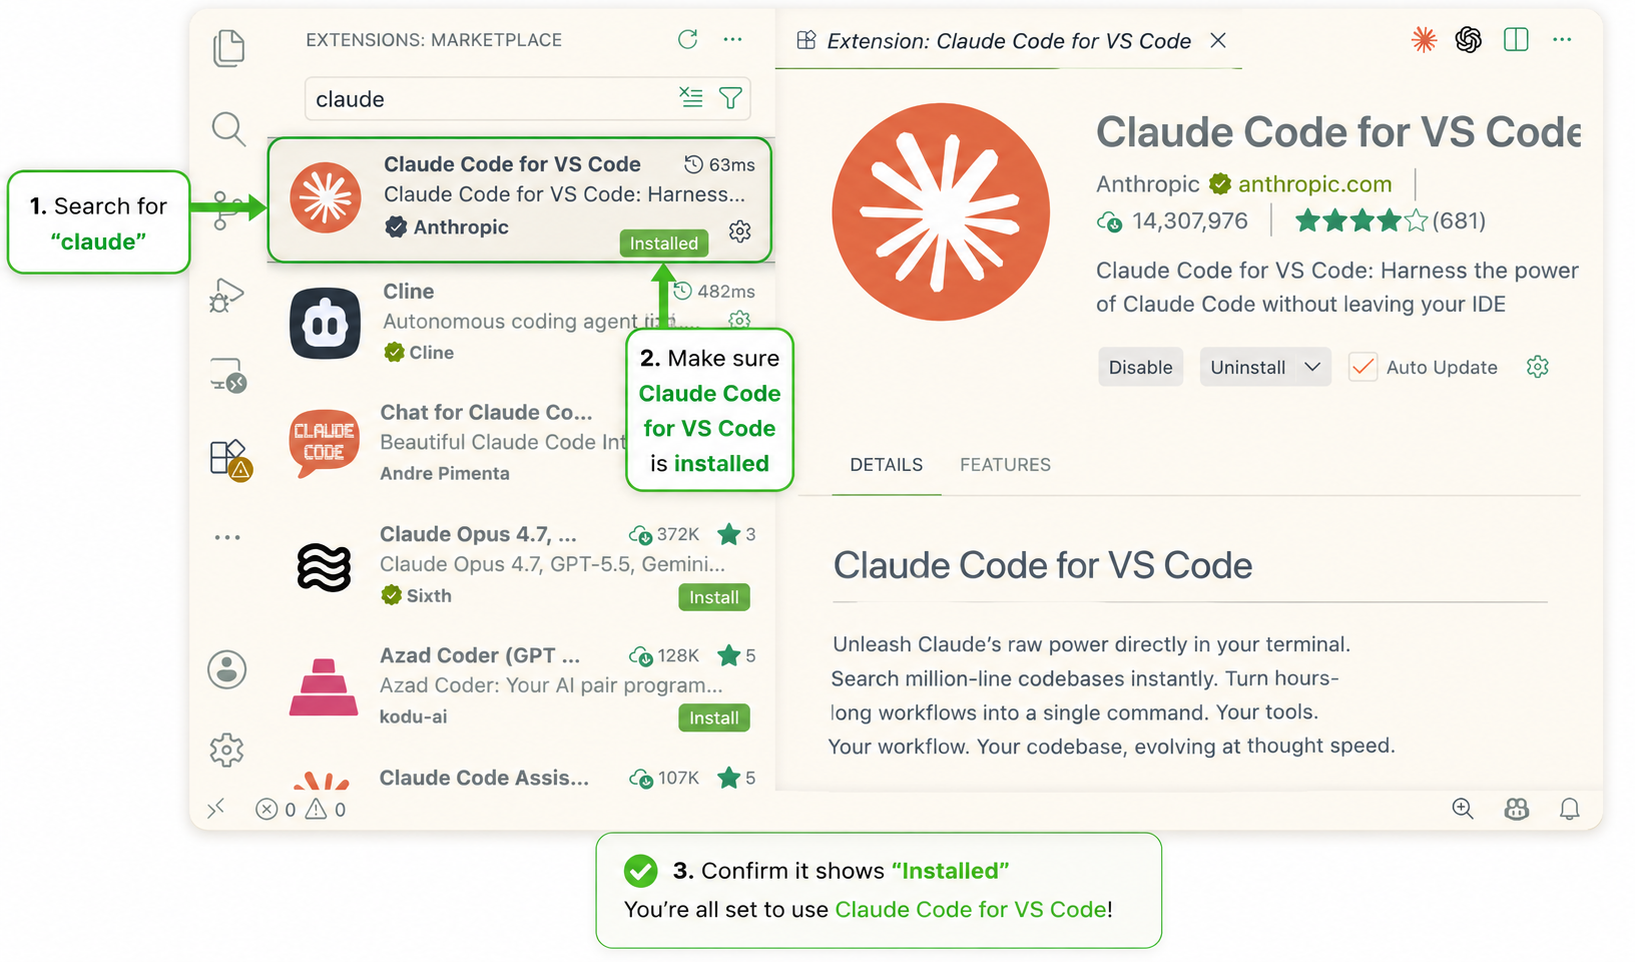
First, make sure the Claude Code extension is installed and enabled.
Then open your user settings.
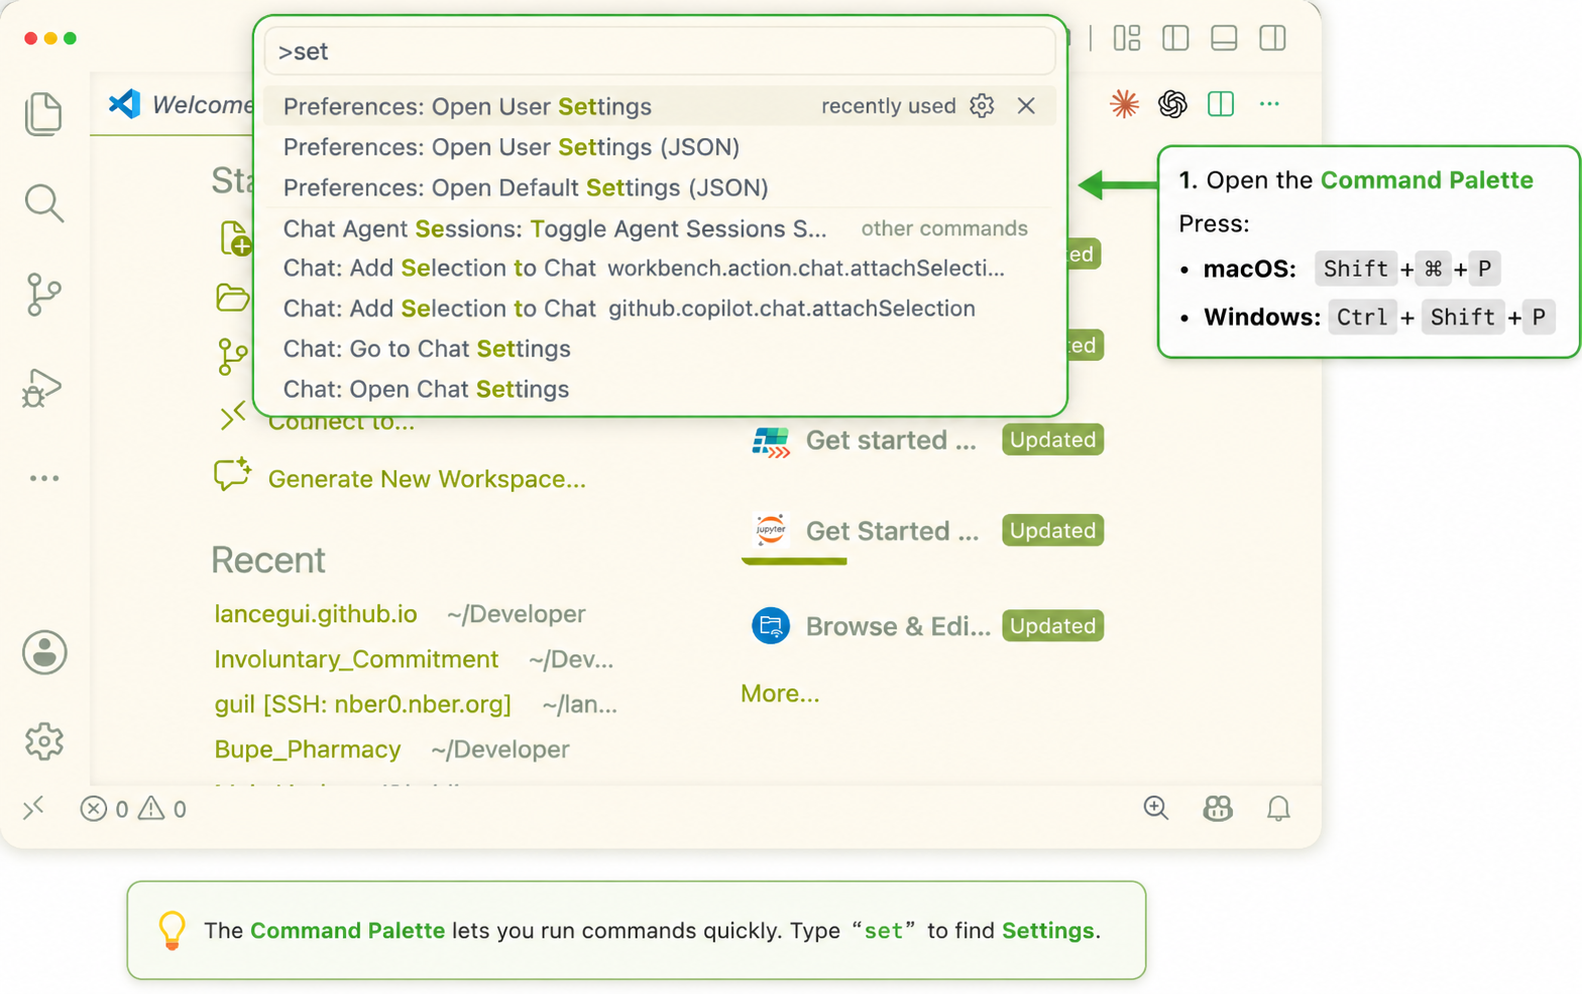
Shift + Command + P and search for settings.Add this block to VS Code settings.json:
"claudeCode.environmentVariables": [
  { "name": "ANTHROPIC_BASE_URL", "value": "http://localhost:1234" },
  { "name": "ANTHROPIC_AUTH_TOKEN", "value": "lmstudio" }
]
Restart VS Code after changing the settings. Then test it with something small:
Using the local model, summarize the files in this folder in three bullets.
If Claude Code responds, the routing worked. If it fails, check three things first: LM Studio’s server is running, a model is loaded, and the port is still 1234.
Now Claude Code is working inside your VS Code project, but the model can be local. It is not magic. It is plumbing. A lot of applied AI is getting the plumbing right.
When to reach for the local model
The local model is not for everything. It is another gear. Reach for it when the task is:
- Editing short text
- Fixing short blocks of code
- Cleaning notes
- Drafting small scripts
- Working with private notes
- Working on a plane or anywhere without internet
The private notes point matters. If you use a system like Obsidian to manage your life or write journals, you may not want every thought sent to an online service. A local model gives you a useful private workspace.
The point is not to become a local-model purist. Sometimes you need the strongest model available. Sometimes you need the model that is already running on your laptop.
Bonus: a cheap cloud fallback
Once the work is organized around a harness, the model underneath becomes swappable. The same settings.json pattern that points Claude Code at your laptop can point it at a cheaper API model on the days you need more reasoning, or a bigger context window than the laptop can hold.
The one I reach for is DeepSeek. It sits in a useful middle ground: not always smarter than the top frontier models, but cheap, with a large context window and an Anthropic-compatible endpoint. Its current docs list deepseek-v4-pro and deepseek-v4-flash with a 1M context length and low per-token prices, especially when context caching hits. Check the live DeepSeek pricing page before using it heavily, because API prices change.
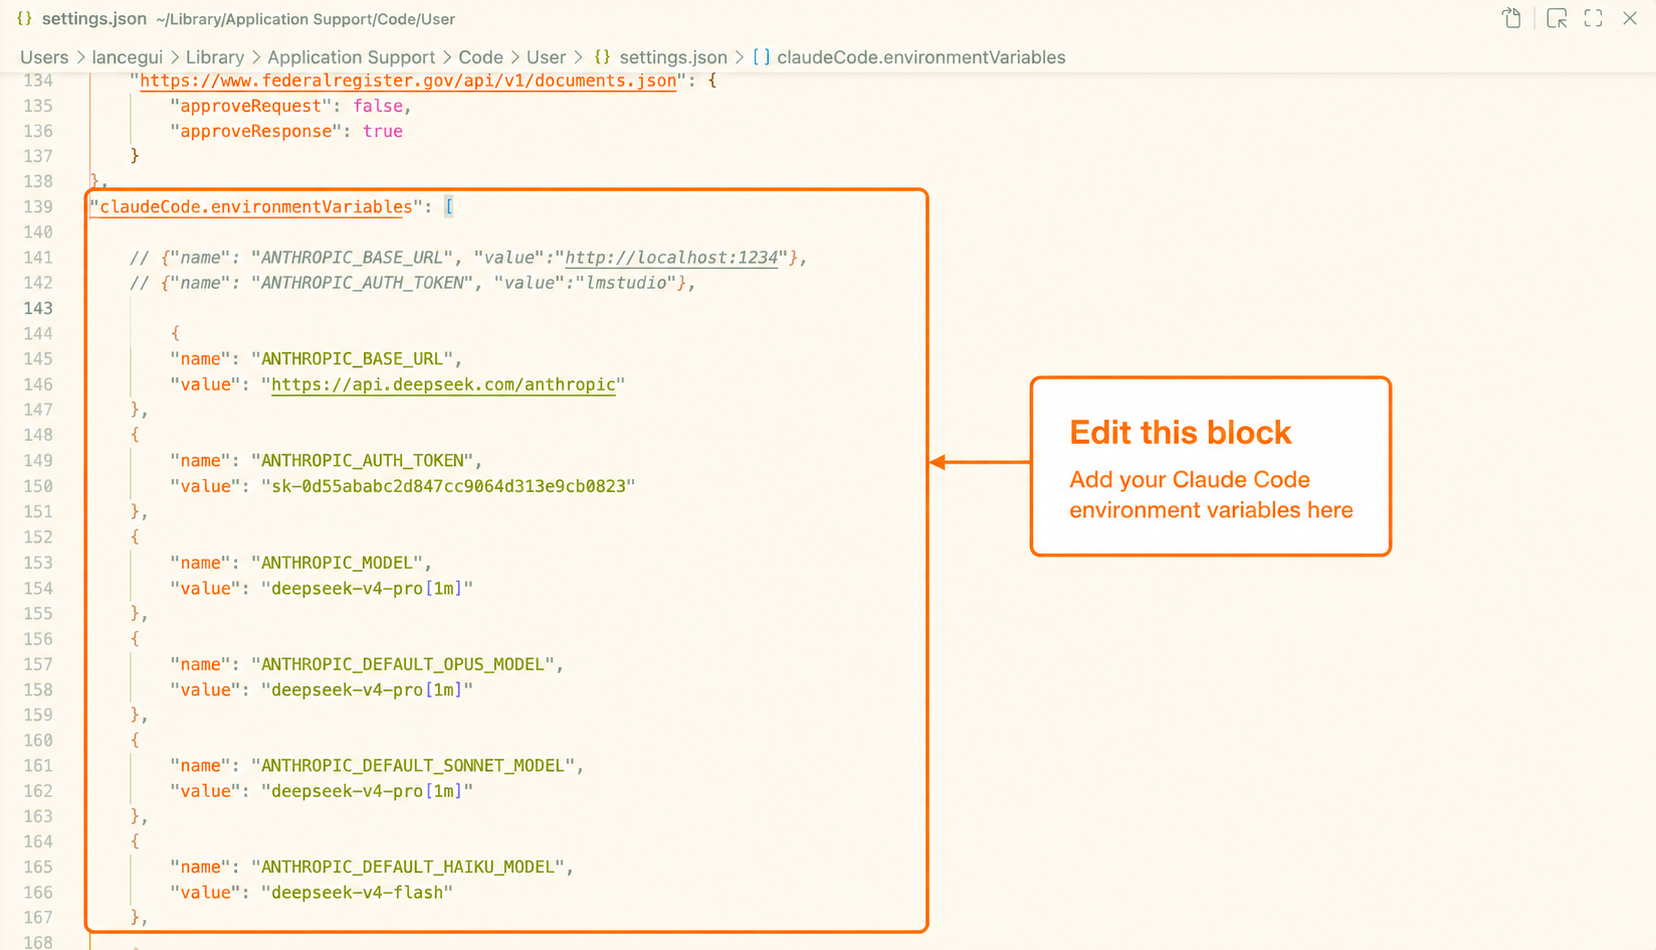
To route Claude Code to DeepSeek, replace YOUR API KEY with a key from the DeepSeek platform:
"claudeCode.environmentVariables": [
  {
    "name": "ANTHROPIC_BASE_URL",
    "value": "https://api.deepseek.com/anthropic"
  },
  {
    "name": "ANTHROPIC_AUTH_TOKEN",
    "value": "YOUR API KEY"
  },
  {
    "name": "ANTHROPIC_MODEL",
    "value": "deepseek-v4-pro[1m]"
  },
  {
    "name": "ANTHROPIC_DEFAULT_OPUS_MODEL",
    "value": "deepseek-v4-pro[1m]"
  },
  {
    "name": "ANTHROPIC_DEFAULT_SONNET_MODEL",
    "value": "deepseek-v4-pro[1m]"
  },
  {
    "name": "ANTHROPIC_DEFAULT_HAIKU_MODEL",
    "value": "deepseek-v4-flash"
  },
  {
    "name": "CLAUDE_CODE_SUBAGENT_MODEL",
    "value": "deepseek-v4-flash"
  },
  {
    "name": "CLAUDE_CODE_EFFORT_LEVEL",
    "value": "max"
  }
]
Restart VS Code and test with a small request before sending a large job:
What model are you using, and what is the current project folder?
The pattern is always the same: point the harness at a compatible endpoint, set the model names, restart, and test small. Whether the engine is your laptop or a cheap API, the workflow does not change.
Enjoy Reading This Article?
Here are some more articles you might like to read next: